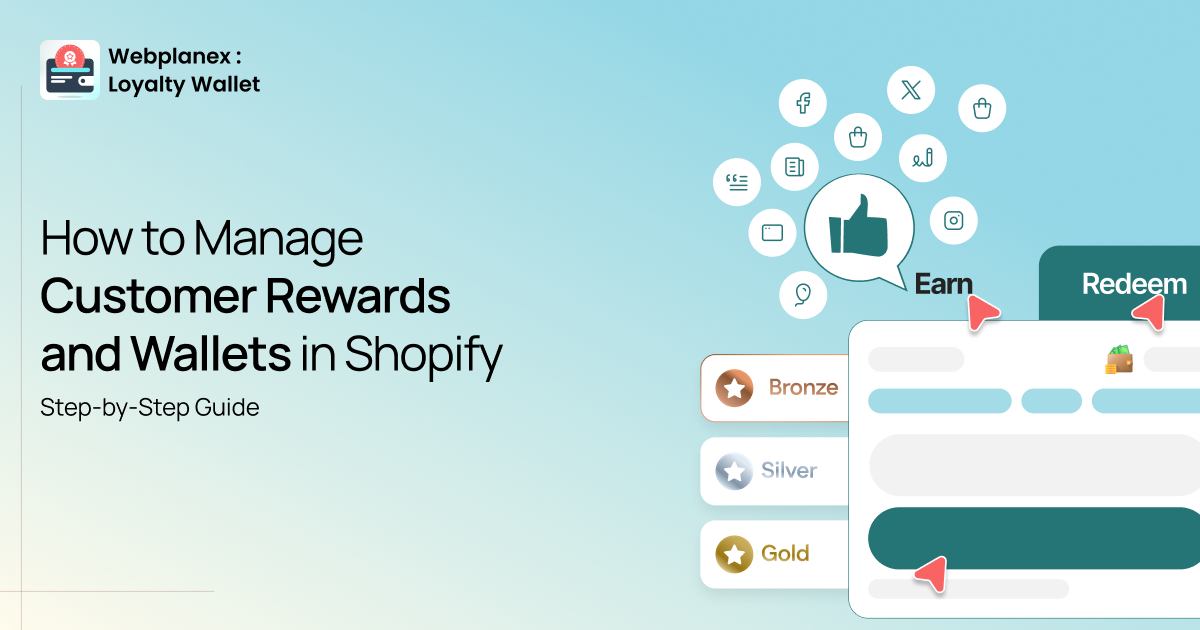
How to Manage Customer Rewards and Wallets in Shopify (Step-by-Step Guide)
Honestly, most Shopify store owners don’t even consider a loyalty program until something shakes things up. Maybe your retention numbers are tanking. Or a competitor rolls out a loyalty scheme, and now your regular customers keep asking why you don’t offer rewards. Whatever brought you here, you’re facing it. So let’s sort this out.
The Webplanex Loyalty Wallet (Customer Rewards, Loyalty & Store credit Program by Webplanex) is one of those apps that sounds simple on the surface but has a surprising amount of depth once you get into the settings. This blog covers the whole thing, setup, configuration, day-to-day management, the works.
First, a Quick Word on Why Rewards Beat Discount Codes
Discount codes feel good to give out. They're easy to create, customers understand them, and they create a short-term bump in conversions. But here's the problem: they don't bring people back. Someone uses a 15% off code, checks out, and forgets your store exists until the next time you run a sale or blast their inbox.
A wallet is different. When a customer has ₹200 sitting in a store wallet, that money belongs to them psychologically. It belongs to them. When they don’t use it, it feels like they’re missing out, and that feeling keeps them coming back, and digital rewards are changing the merchant marketing. That’s the whole idea behind the Webplanex Loyalty Wallet. Honestly, it works.
Step 1: Install the App and Get It Talking to Your Theme
Go to the Shopify App Store, search "Webplanex Loyalty Wallet," and install it. That part takes two minutes. The part most people miss comes right after.
Once the app is installed, you need to manually activate the storefront widget inside your theme editor. Here's how: go to Online Store → Themes → Customize, and look for the App Embeds toggle in the left panel. Find Webplanex there and switch it on.
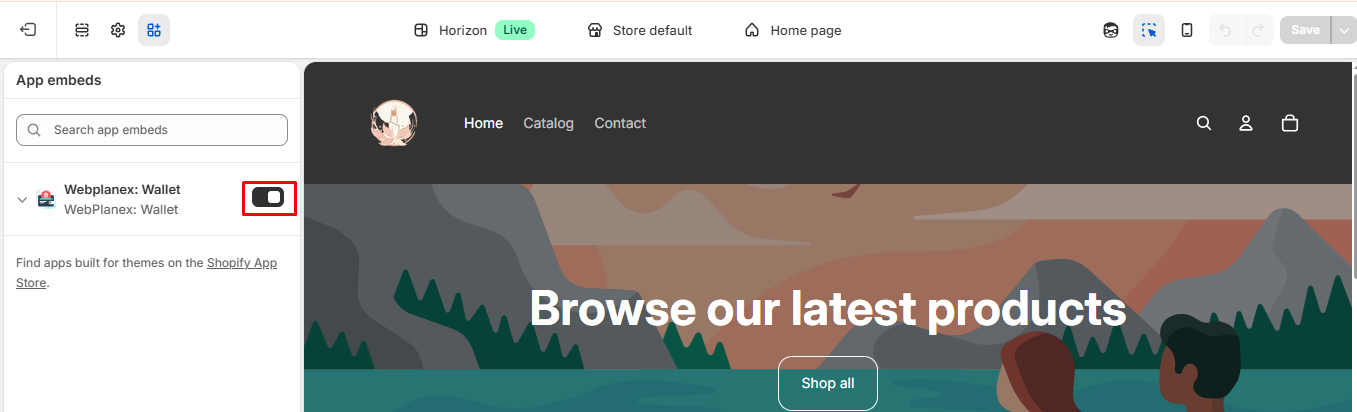
If you skip this, the backend will be fully configured, but customers will never actually see their wallet.
Step 2: Set Your Store Credit Percentage (and Don't Overthink It)
Inside the app dashboard, find Earn Rules or Rewards Settings, the label varies slightly depending on which version of the app you're on.
This is where you decide how much credit customers earn on each purchase.But make sure that you know what’s better for long-term growth, loyalty or discount? For most product categories, 3–5% is a reasonable starting point. You want customers to notice the reward and get excited about it, but you don’t want to lose money on every order. There are a couple of settings that seem small but actually make a difference.
First, look at your minimum order threshold. You can set it up so customers only get rewards if their order is above a certain amount. For example, most people spend about ₹800 an order. If you set the reward to start at ₹400 or ₹500, you’re covering yourself on the little transactions without making most of your customers feel left out.
Reward expiry date. This one's worth thinking about carefully. Set credits to expire, 90 days is a common choice, and you create urgency. Customers get a gentle reminder to come back before they lose what they've earned. Set it too short (30 days), and people might get annoyed. Too long or never, and the credits just sit there doing nothing for your retention numbers.

Product or collection exclusions. Got a category that's already deeply discounted or margin-thin? Exclude it. The app lets you carve out specific products or collections from the earn rules.
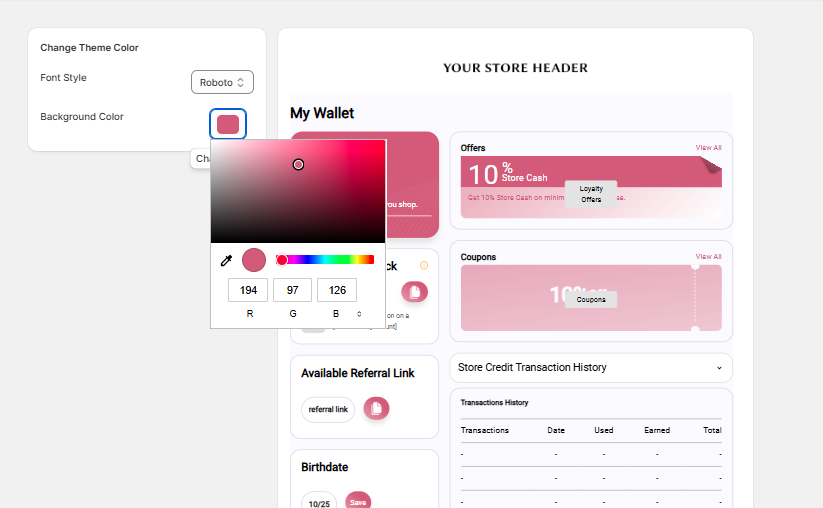
Step 3: Customize the Wallet Widget (It Should Look Like It Belongs)
A widget that screams "third-party app" is a widget people ignore. Spend a little time in the Widget Settings matching the colors and fonts to your store's vibe.
You can control the icon style, the background color of the pop-up panel, button colors, and the copy shown to customers. Change the default labels if they feel generic, something specific to your brand ("Your Store Credits" instead of "Your Wallet Balance") tends to land better.
Also make sure the widget renders properly on mobile. Open your store on your phone after enabling it. It's shockingly common for widgets to overlap product images or cover the add-to-cart button on smaller screens, and if that's happening, you'll lose sales, not gain loyalty.
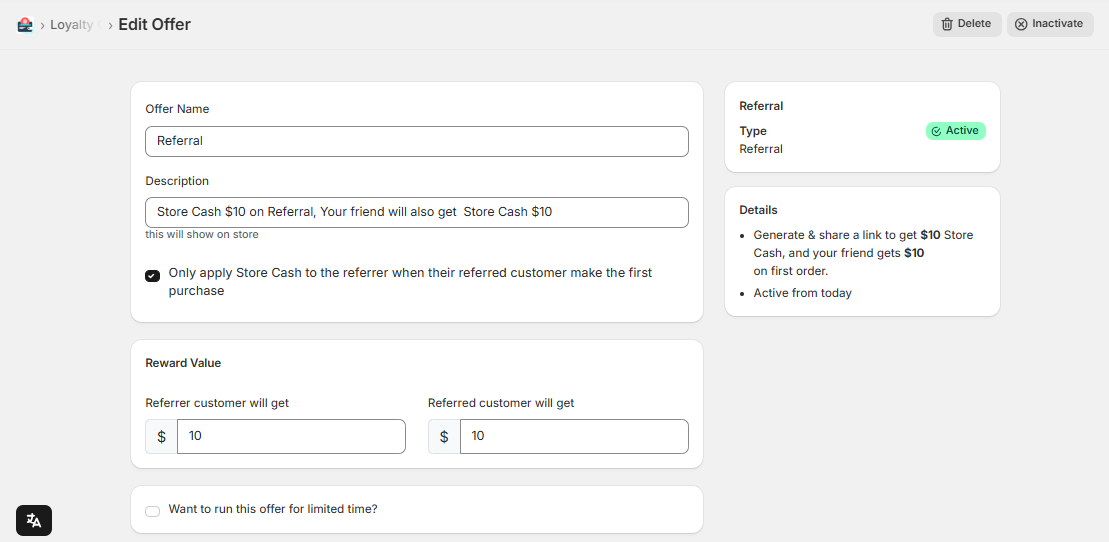
Step 4: Turn On Referrals
Under Referral Settings, you can enable the referral program. Existing customers get a personal referral link. When a new person orders using that link, both sides get wallet credits. It works better than a regular referral widget because of timing, people are already in their wallet, checking their balance, and the link is right in front of them. There’s pretty much no extra effort needed to share it. They don’t have to go somewhere else or sign up again.
And for rewards, keep it straightforward. A line like “Earn ₹150 when a friend places their first order” is clear and easy for anyone to share or remember.
Complex tiered referral bonuses sound exciting in a planning doc, but confuse customers in practice.
Step 5: Configure How and When Credits Can Be Redeemed
This is arguably the most important part of the whole setup and also where stores tend to make the biggest mistakes.
In Redemption Settings, you'll find controls for:
- The minimum wallet balance required before redemption unlocks
- The maximum percentage of an order that can be paid with credits
- Whether certain products are excluded from redemption
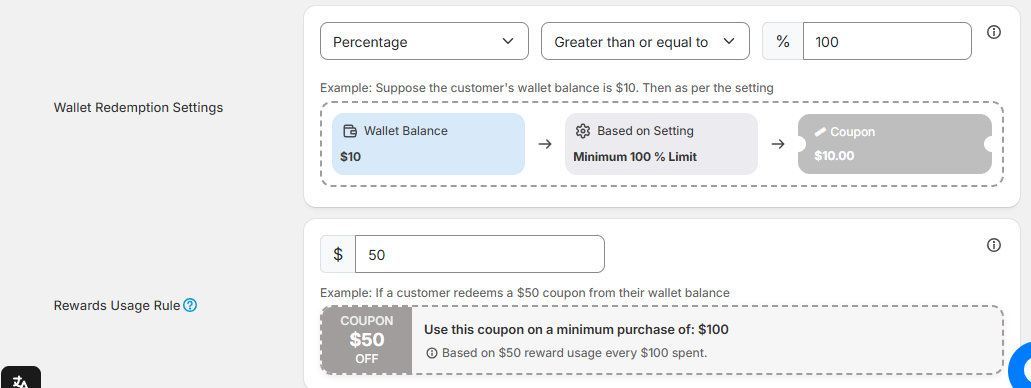
That second one, the redemption cap, really matters. If you let customers pay 100% of an order with wallet credits, you'll end up with edge cases where someone redeems everything on a high-value order, and you're essentially giving away product. A cap of 30–40% of the order value is a common and sensible guard against that.
After you set it up, Shopify’s checkout automatically shows the wallet balance as a payment option. Customers just flip a toggle to use their credits, no need for you to mess with any custom code.
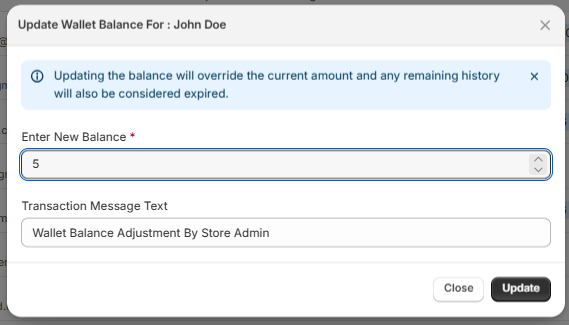
Step 6: Manually Adjust Wallets When Customer Service Situations Come Up
This will happen. A customer emails saying their reward didn't credit after a legitimate purchase. Or someone had a bad delivery experience, and you want to offer goodwill credits instead of a refund. These situations come up weekly for most active stores.
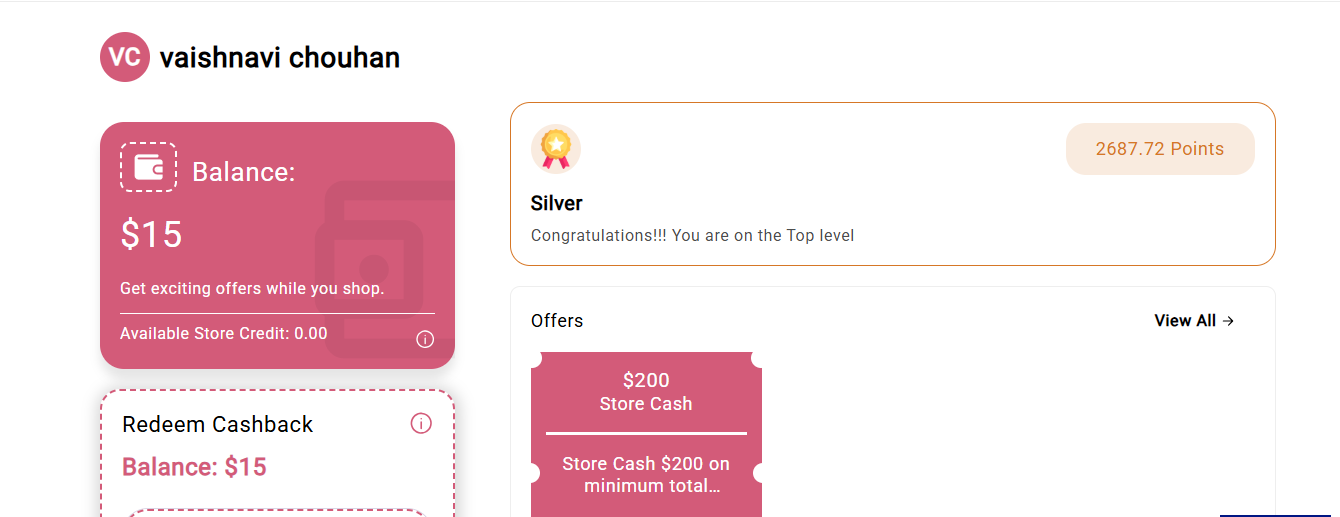
In the Customers section of the app, search for any customer by name or email, and you'll see their complete wallet history, every credit earned, every redemption, expiry dates, and the source of each transaction. You can add or subtract credits manually right from this screen, and you can attach an internal note explaining why.
Manually dropping ₹200 in goodwill credits into a frustrated customer's wallet is genuinely more effective than sending a discount code. The code feels like a coupon. The wallet credit feels like something that's theirs.
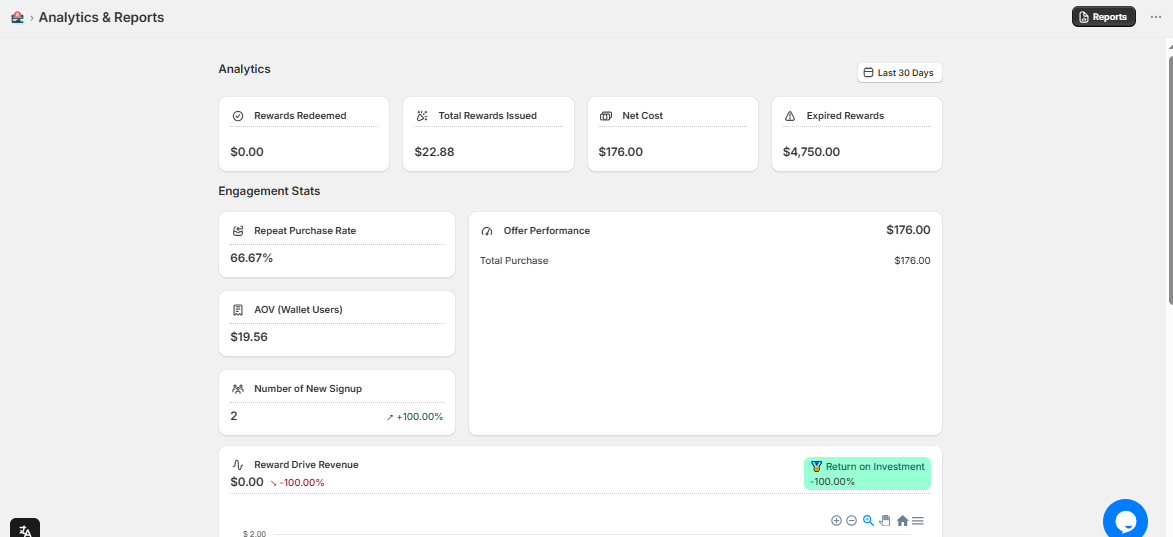
Step 7: Check the Analytics and Actually Use Them
After the first 3–4 weeks with the program live, pull up the Analytics tab and look at a few things.
What's your redemption rate? If it's very low, customers either don't know about their balance or they're not being reminded at key moments (post-purchase emails are great for this). If redemption is happening on almost every single order, your store-credit rate might be too generous and eating into margins.
Also, compare the average order value of customers who redeem wallet credits versus those who don't. In most cases, wallet redemption correlates with slightly higher order values, and customers top up their purchase to "justify" using their credits. That's exactly the behavior you want the program to drive.
Adjust the credit percentage, expiry window, or redemption cap based on what you're seeing. This isn't a set-it-and-forget-it thing. The stores that actually get compounding value from loyalty programs are the ones treating it like a channel, reviewing it, tweaking it, and promoting it actively.
Conclusion
Setting up Webplanex Loyalty Wallet properly takes maybe a couple of hours the first time. But once it's running and you've dialed in the earn and redemption rules, it does a lot of the retention work quietly in the background. Customers build up balances, come back to use them, spend a little more while they're there, and sometimes bring a friend along for the referral credit.
It's not a magic bullet, nothing in e-commerce really is, but it's one of the more reliable ways to stop relying entirely on paid traffic to keep your store alive. And for the effort involved, the return is pretty hard to argue with.